MZ

Hot

Post Top Ad

Post Top Ad

Creamy Russian Salad Recipe

March 11, 2018
My whole family likes it and eat it happily when I cook it. It is very expensive to afford in bazar but I make it at home in only 70 Rs(4 serves) whereas in bazar a single plate is of Rs 100. It is very refreshing. It Can be eaten in aftari or before meals.

Creamy Russian Salad Recipe
INGREDIENTS:

1. Carrot Chopped in Cubes: 1/4 cup 
2. Potato Chopped in Cubes: 1 potato 
3. Peas: 1/4 cup 
4. Apple Chopped in Cubes: 1 Apple 
5. Mango: 1 Mango 
6. PineApple: 1/4 cup 
7. Cream: 3 tbsp 
8. Mayonnaise: 3 tbsp 
9. Yogurt: 4 tbsp 
10. Chicken: a small amount 
11. Salt: 2 to 3 pinches 
12. Pepper: 1/4 tsp 
13. Sugar: 1 tbsp

How to make Creamy Russian Salad


METHOD:

1. First boil the chicken, chopped potatoe, and chopped carrot. 
2. Now add cream, yogurt, mayonnaise, salt, pepper and sugar in a bowl and mix well. 
3. Add the boiled ingredients and all fruits to the mixture. 
4. Mix it properly. 
5. Tasteful and refreshing creamy Russian salad is ready. 
6. Now serve it in colourful bowl because it looks good. You can serve to four persons.
Read More

French Omelettes Recipe in Urdu

March 11, 2018

French Omelettes in Urdu is an easy and traditional cooking recipe to prepare at home. It provides you an awesome taste of Breakfast Menu by Zarnak Sidhwa.
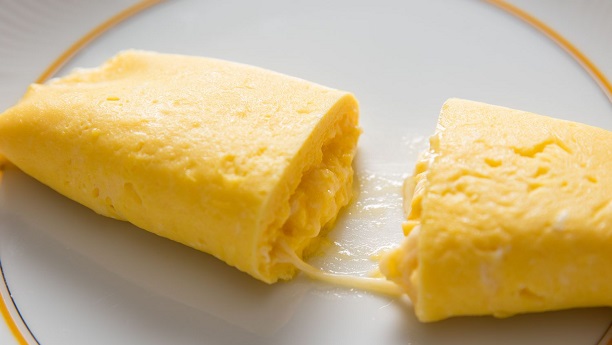

French Omelettes Recipe

فرنچ آملیٹس

اجزاء:
مرغی ابلی اور ریشہ کی ہوئی 250 گرام
انڈے ۔۔ چار عدد
پیاز چوپ کی ہوئے ۔۔ دو کھانے کے چمچے
ہرا دھنیا چوپ کیا ہوا ۔۔ ایک چائے کا چمچہ
ہری مرچیں چوپ کی ہوئی ۔۔ ایک چائے کا چمچہ
پسی ہوئی لال مرچ ۔۔ ایک چائے کا چمچہ
چیڈر چیز کدوکش ۔۔ 25 گرام
کھمبی(باریک کٹی ہوئی) چار عدد
نمک ۔۔ حسب ذائقہ
تیل ۔۔ 4/1 پیالی
سلاد پتے سجانے کے لئے

French Omelettes banane ka tarika

ترکیب:
انڈے کی سفیدی اور زردی الگ الگ کرلیں۔ سفیدیوں کو الیکٹرک بیٹر کی مدد سے جھاگ اوپر آنے تک پھینٹیں۔ اس میں زردیاں، پیاز، ہری مرچیں، ہرا دھنیا، لال مرچ اور نمک ملا لیں۔ فرائنگ پین میں آدھا تیل گرم کریں اور اس میں انڈے کا آدھا آمیزہ ڈال کر پھیلائیں۔ اس کے اوپر آدھا کھمبی اور آدھا پنیر پھیلا کر ہلکی آنچ پر پکائیں۔ فرائنگ پین میں باقی تیل گرم کریں اس پر انڈے کا باقی آمیزہ پھیلا کر سنہری کریں اور اسے پلٹ دیں۔ اس پر مرغی باقی کھمبی اور باقی پنیر ڈالیں دہرا کر کے پکائیں۔
Read More

Chicken Korma

March 11, 2018
Chicken Korma  Recipe

            INGREDIENTS:

Onions 
4/5 Tomatoes 
6/7 tables spoonful’s of iOS 
Salt, red chili powder to taste 
Coriander powder 1Teaspoon 
Chicken cut into 12 pieces skinned and fat free 
Garam masala 
5/6 pepperCorn
2 big Cardamom
2 sticks Cinnamon 
Cloves 
You can use peeled American or irani Almonds opened into two halves also 
1 and half pao yoghurt 


How to make Chicken Korma 


METHOD:

Thoroughly wash and clean the chicken pieces keep aside soaked in water 
Take oil fry sliced onions till soft then add sliced tomatoes after frying till soft add chili powder salt 
Coriander powder and Garam masala sauté till aroma rises to fill the whole house then add chicken pieces and keep stirring till onions and tomatoes become one paste add yoghurt then add water if needed in order to get a thick consistency. Add halved peeled almonds for decoration looks tempting if the oil thrushes to the top and floats on the chicken qorma. Now it is ready to eat serve in a deep or no so shallow dish. Eat hot 
Read More

Spicy Thai soup Recipe

March 11, 2018
Spicy Thai soup Recipe 
INGREDIENTS:

6 cups stock 
2 tbsp flour 
1 tbsp Butter 
2 tbsp Coriander leaves 
2 tbsp Lemon juIce 
2 tbsp Coconut Milk powder 
1 tbsp chilli Oil 
1 tsp each of Salt, white pepper and Chinese Salt 
3–4 Mushrooms, slIce
1 kashmiri chilli, soaked and ground 
½ cup Tomato cubes, seeded and cut into square pieces

How to make Spicy Thai soup


METHOD:

1. Heat butter in a deep pan and saute the flour. 
2. Add the ground chilli and fry, then add the stock with all the seasonings and lemon juice. 
3. Dissolve the coconut milk powder in some of the stock and add. 
4. Let it simmer until thick. Lastly, add in chilli oil, tomato cubes, mushroom slices and coriander stalks. 
5. This recipe Serves four. Enjoy!
Read More

Fresh Green Spicy Fish

March 11, 2018
Fresh Green Spicy Fish Recipe
NGREDIENTS:

1) Pomfret 1 1/2 kg (whole) 
2) Fresh Coriander leaves 2 bunches 
3) Green chilies 10 
4) JuIce of Lemons 4 
5) Garlic 1 pod 
6) Tomatoes 2 finely chopped 
7) Curry leaves 6 
8) Salt to taste 
9) Vinegar 3 tbsp 
10) Cooking Oil for frying 

How to make Fresh Green Spicy Fish


METHOD:

1) Clean fish with salt and one tablespoon vinegar. 
2) Marinate fish with half of the lemon juice for 1 hour. 
3) Grind the tomatoes, garlic, green chilies and coriander leaves. 
4) Fry this mixture in one-tablespoon oil and then add the remaining lemon juice. 
5) Lightly deep-fry the marinated fish and then spread the green spice on 
it. 
6) Add curry leaves and simmer for a little while, sprinkle with a little 
lemon juice and serve.
Read More

Spicy Oven Baked Lamb Chops

March 11, 2018
Spicy Oven Baked Lamb Chops Recipe
INGREDIENTS:

8 double-boned lamb best end chops 
JuIce of 1 Lime 
3 tbsp malt Vinegar 
1 tsp chili powder 
125ml mustard Oil or vegetable Oil, plus extra for frying 
85g gram flour (chickpea flour
Star anise toasted in a hot pan 
3 green chilies 
Garlic Cloves 
1 small Papaya, peeled, seeded and chopped 

How to make Spicy Oven Baked Lamb Chops


METHOD:

1. Marinate the chops in the lime juice, vinegar, chili powder and a pinch of salt while you make the rest of the marinade. 
2. Heat 100ml of the oil in a small saucepan and add the gram flour, stirring continuously for a minute or two until the flour forms a smooth sandy paste and you begin to smell a nutty aroma. Transfer the paste to a bowl and leave to cool. 
3. Crush the star anise using a pestle and mortar, then tip into a food processor with the chilies, garlic, papaya and the remaining oil and blend to a smooth paste. Mix both pastes over the marinated meat and refrigerate for a minimum of 4 hours. 
4. To cook the chops, preheat the oven to fan 180C/conventional 200C/gas 6. Lift the chops out of the marinade and wipe off any excess so the chops are just lightly coated. Heat 1 tbsp oil in a large frying pan and fry the chops in batches for a couple of minutes on each side until browned. Transfer to a roasting tray and roast for 10-20 minutes depending on how pink you like your lamb. Serve the chops with mint sauce. 
Read More

ONE POT CHILI CHEESE PASTA

February 24, 2018


ONE POT CHILI CHEESE PASTA

INGREDIENTS:

  • 1 tablespoon olive oil
  • 1 sweet onion, diced
  • 2 garlic cloves. minced
  • 1/2 teaspoon salt
  • 1/4 teaspoon pepper
  • 1 pound lean ground beef (I used 93% lean)
  • 2 tablespoons tomato paste
  • 1 tablespoon chili powder
  • 2 teaspoons smoked paprika
  • ½ teaspoon ground cumin
  • 1 (14 ounce) can fire roasted tomatoes
  • 1 (4-ounce) can diced green chiles
  • 2 1/2 cups low-sodium beef or chicken stock (or water! any liquid, really)
  • 8 ounces elbow noodles (I like whole wheat ones!)
  • 6 ounces white cheddar cheese, freshly grated
  • 3 green onions, thinly sliced
  • sour cream, for serving

DIRECTIONS:

Heat a large pot over medium-low heat and add the olive oil. Stir in the onion, garlic, salt and pepper. Cook until the onions soften, about 5 minutes. Add the ground beef, breaking it apart with a wooden spoon. Cook, stirring often, until the beef is browned, about 6 to 8 minutes. At this time I like to keep breaking the beef apart. I also occasionally increase the heat in order to cook off some of the fat from the beef.
Once the beef is browned, stir in the tomato paste, chili powder, paprika and cumin. Cook for another 5 minutes, stirring often. Pour in the tomatoes, green chiles and stock (or water). Add in the pasta. Bring the mixture to a simmer, then cover the pot and cook for 10 to 15 minutes, stirring occasionally. The pasta should absorb all the liquid and plump up! You don’t want the heat too high, because the pasta can stick on the bottom. If it needs a few more minutes, keep the pot covered.
Once the pasta is cooked and the liquid has been absorbed, stir in the cheddar cheese. Taste and season additionally if needed.
Serve immediately with sliced green onions and if you’re really feeling it, sour cream for serving.
Read More

Chili Cheese Pasta Is a Weeknight Wonder

February 24, 2018

ONE POT CHILI CHEESE PASTA

INGREDIENTS:

  • 1 tablespoon olive oil
  • 1 sweet onion, diced
  • 2 garlic cloves. minced
  • 1/2 teaspoon salt
  • 1/4 teaspoon pepper
  • 1 pound lean ground beef (I used 93% lean)
  • 2 tablespoons tomato paste
  • 1 tablespoon chili powder
  • 2 teaspoons smoked paprika
  • ½ teaspoon ground cumin
  • 1 (14 ounce) can fire roasted tomatoes
  • 1 (4-ounce) can diced green chiles
  • 2 1/2 cups low-sodium beef or chicken stock (or water! any liquid, really)
  • 8 ounces elbow noodles (I like whole wheat ones!)
  • 6 ounces white cheddar cheese, freshly grated
  • 3 green onions, thinly sliced
  • sour cream, for serving

DIRECTIONS:

Heat a large pot over medium-low heat and add the olive oil. Stir in the onion, garlic, salt and pepper. Cook until the onions soften, about 5 minutes. Add the ground beef, breaking it apart with a wooden spoon. Cook, stirring often, until the beef is browned, about 6 to 8 minutes. At this time I like to keep breaking the beef apart. I also occasionally increase the heat in order to cook off some of the fat from the beef.
Once the beef is browned, stir in the tomato paste, chili powder, paprika and cumin. Cook for another 5 minutes, stirring often. Pour in the tomatoes, green chiles and stock (or water). Add in the pasta. Bring the mixture to a simmer, then cover the pot and cook for 10 to 15 minutes, stirring occasionally. The pasta should absorb all the liquid and plump up! You don’t want the heat too high, because the pasta can stick on the bottom. If it needs a few more minutes, keep the pot covered.
Once the pasta is cooked and the liquid has been absorbed, stir in the cheddar cheese. Taste and season additionally if needed.
Serve immediately with sliced green onions and if you’re really feeling it, sour cream for serving.
Read More

Recipe: Cinnamon Sugar Scones

February 24, 2018
Recipe: Cinnamon Sugar Scones
Who can forget the joy of discovering cinnamon toast as a kid? The enchanted combination of butter, sugar, and cinnamon seemed to pop up all the time: on Sunday mornings, it was the pleasure of a lazy breakfast with family; after school it seemed to cure scraped knees and later heartbreak; and when we first left home, it was the snack of choice at 2 a.m.
Now that we're all grown up, that same comfort and pleasure has grown up with us in the form of warm, freshly baked scones studded with lots of little crumbles of cinnamon sugar and Land O Lakes® Unsalted Butter. Finally, they get brushed with buttery cinnamon sugar and drizzled with cinnamon sugar glaze.
Yet, all this sweet cinnamon-y goodness does not take hours of work. The scones come together quickly and easily. In fact, mixing the crumbly, buttery dough is the perfect job for little hands. Then, unbaked dough keeps in the freezer for whenever a cinnamon toast emergency arises. You can pop the pre-made scones in the oven straight from the freezer.
Land O Lakes® Unsalted Butter
Throw a spur of the moment brunch for friends, show your grandmother you really do know how to bake, or make a batch ahead to pop in the oven one holiday morning. No matter the occasion, you'll be imparting new cinnamon toast memories on whomever you share them with.

Cinnamon Sugar Scones

Yield: 12 scones
For the scones:
3/4 cup (12 tablespoons) Land O Lakes® Unsalted Butter, chilled, cubed, and divided
2/3 cup demerara or turbinado sugar, divided
1 tablespoon ground cinnamon
3 cups all-purpose flour
1 tablespoon baking powder
1/2 teaspoon salt
1 large egg yolk
1 cup cold heavy cream
1 teaspoon vanilla extract
For the cinnamon sugar topping: (optional)
1 tablespoon Land O Lakes® Unsalted Butter, melted
1/2 teaspoon ground cinnamon
2 tablespoons demerara or turbinado sugar
For the cinnamon sugar glaze: (optional)
3/4 cup powdered sugar
3 tablespoons Land O Lakes® Heavy Whipping Cream
1/4 teaspoon ground cinnamon
Arrange a rack in the middle of the oven and heat to 400ºF.
Place 4 tablespoons of the butter, 1/3 cup of the sugar, and cinnamon in a small bowl and mash until well combined; set aside.
Read More

The 3-Step Method for Easier

February 24, 2018
Every Sunday I make a batch of hard-boiled eggs and stash them in the fridge to turn into quick breakfasts, lunches, and snacks throughout the week. Cooking the eggs is no problem, but peeling them can be a tedious chore. Over the years, I found that three factors make an egg easier to peel: the age of the eggs, the cooking method, and the cooling method.

Step 1: Choose older eggs.

"What do my egg choices have to do with easy-to-peel hard-boiled eggs?" you might be wondering. Turns out older eggs peel more easily. I'm not suggesting that you dig through the egg case for the oldest lay date, because a week's difference in supermarket eggs won't make a noticeable difference in the peeling of your hard-boiled eggs. But if you typically source your eggs from the farmers market or your neighborhood chickens (lucky you) than you'll want to let those eggs sit in the fridge for a week.
As eggs age they gradually lose moisture through the pores in their shell, and the air pocket at the tip expands. The pH of the egg's outer membrane (a thin layer of protein between the shell and the egg white) also changes, going from a low pH to a relatively high pH, which makes them adhere less strongly to the shell.

Step 2: Steam your eggs.

Two unconventional methods will give you easy-to-peel hard-cooked eggs, and both involve steaming. The first is a simple stovetop steam, where a few inches of water is brought to a boil and a steamer basket of eggs is lowered into the pot. Let the eggs steam for 20 minutes.
The second method is pressure steaming. The eggs are cooked on a steamer basket or rack inside a stovetop or electric pressure cooker. Reportedly, in both cases, the steam vapor enters the shell, loosening the membrane that is responsible for hard-to-peel eggs.
If you prefer to boil your eggs, but still want them to be easy to peel, start them in boiling water. This goes against our favorite method for perfect boiled eggs, which starts in cold water. Unfortunately, a cold water start actually binds the egg's membrane with the egg white as the water and eggs slowly come to temperature together. That being said, if you love the texture of eggs started in cold water, then using older eggs and shocking them using the method below will still give you easier-to-peel hard-boiled eggs.

Step 3: Cool the eggs completely.

Shocking hard-boiled eggs — that is plummeting them into a bowl of ice water — right after boiling also makes an easier-to-peel egg. The rapid cooling of the eggs contracts the egg whites, releasing them from the egg's membrane. It also firms the egg white proteins, making them easier to peel. Cool the eggs for at least 15 minutes for even easier peeling.
Read More

Post Top Ad